The pour over that rewards patience and punishes shortcuts. Here's everything you need to brew a genuinely great cup with V60.
The first time I brewed a V60, I was quietly convinced I'd nailed it. I hadn't. The coffee was sharp, thin, and finished with this hollow, unpleasant sourness that lingered longer than it should. I'd gone too coarse, poured too fast, and hadn't bothered with the bloom. Three mistakes at once. The V60 is not forgiving.
That said, once you understand what you're actually doing and why, it becomes one of the most rewarding ways to make coffee, especially if you're the kind of person who wants to taste the difference between a washed Ethiopian and a natural Guatemalan, rather than just drinking something hot and brown in the morning.
This guide is everything I've learned from brewing it badly, then gradually less badly, then well. Equipment, recipe, step-by-step method, and how to fix it when the cup tastes wrong.
What You Need — Equipment
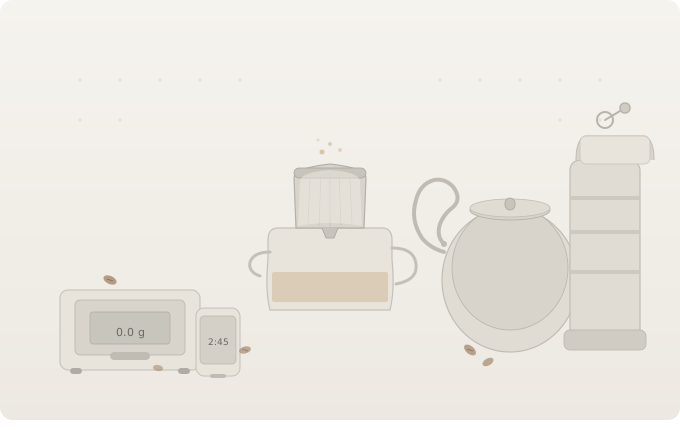
You don't need to spend a fortune here. The V60 dripper itself costs under a tenner. What you do need is the right kit, because some shortcuts matter and some don't.
Coffee Dose and Ratio
The two ratios you'll see everywhere are 1:15 (stronger, slightly more body, less clarity) and 1:16 (balanced, cleaner, more open). For the V60, I always start at 1:16: 15g of coffee to 250ml of water.
It's not that 1:15 is wrong. It's that 1:16 gives the V60 room to do what it does best: separate the flavours, let the acidity breathe, and produce a finish that's clean rather than dense. Once you've got the method dialled in, adjusting the ratio is one of the simplest ways to personalise the cup.
Don't measure by volume. Weigh everything. A scoop is not a recipe.
Grind Size for V60
This is the section that will save you the most frustration, so read it properly.
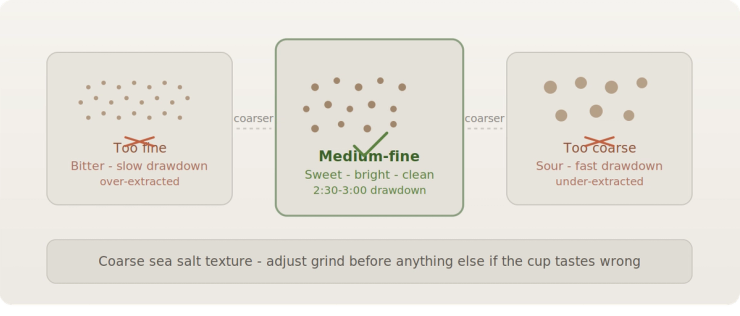
Grind size is your primary control lever for V60 coffee brewing. Not the ratio, not the temperature — grind size. The V60 has a single large hole at the bottom and no built-in flow restriction, which means the speed water moves through the bed is almost entirely determined by how coarse or fine you've ground the coffee.
Aim for medium-fine — the texture of coarse sea salt is the most useful reference I've found. On a Baratza Encore, that puts you around setting 14–16 to start, though every grinder is different and you should treat any setting as a starting point, not a destination.
Too fine and the drawdown slows to a crawl; the coffee tastes bitter and drying, like the inside of your mouth has been lightly sandpapered. Too coarse and the water rushes through in under two minutes; the cup tastes sour and empty, like the coffee gave up halfway through. Neither is enjoyable. The sweet spot — when you're in it — produces a cup with sweetness upfront, brightness through the middle, and a clean, lingering finish.
If your V60 is consistently tasting wrong, change the grind before you change anything else.
Water Temperature
93–96°C (200–205°F) covers most coffees. If you don't have a temperature-controlled kettle, boil and wait about 30 seconds — that drops you into the right zone.
Where it gets more specific:
- •Light roasts need hotter water, at or near boiling. They're denser, harder to extract, and without enough heat you'll pull sour and flat rather than the floral, citrus brightness you paid for.
- •Dark roasts are more soluble — they extract easily — so backing off to 90–93°C helps you avoid pushing into bitterness.
I spent an embarrassingly long time brewing a light Ethiopian at 90°C wondering why it tasted hollow. Bumping to 96°C was like turning the lights on. The sweetness was suddenly there.
How to Brew V60: Step-by-Step
The Method
1. Boil your water. Prepare slightly more than 250ml — you'll use some for rinsing the filter.
2. Rinse the filter. @0:00 Seat the filter in the V60, set it over your preheated mug or server, and pour hot water through it. This does two things: removes the papery taste from the filter, and brings your vessel up to temperature so the coffee doesn't lose heat the moment it lands. Discard the rinse water and don't skip this step — the papery flavour is genuinely noticeable.
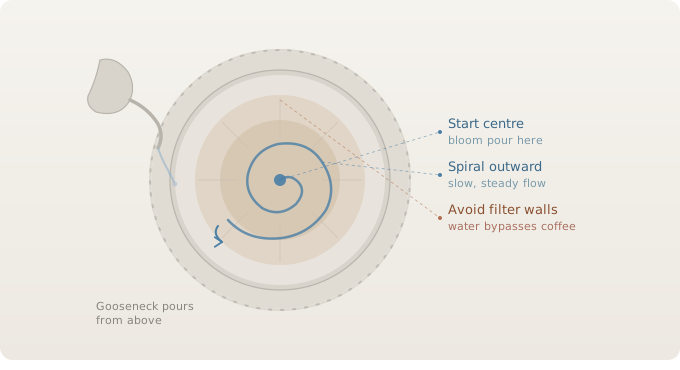
3. Add your coffee. @0:00 Add 15g of freshly ground coffee. Tap the dripper gently to level the bed, then press a small divot into the centre with your fingertip. This gives the bloom water somewhere to pool rather than running off the sides immediately. Tare the scale to zero.
4. Bloom. @0:00–0:45 Pour 30g of water slowly into the centre, moving outward in a gentle spiral until every ground is saturated. Start your timer. Then wait 30–45 seconds.
Why does this matter? Fresh coffee releases CO₂ the moment it contacts hot water. That gas, if you don't let it escape first, creates resistance during extraction — the water can't move evenly through the bed and you get channels, uneven extraction, a flat-tasting cup. The bloom lets it off-gas before you start pouring properly. After 30–45 seconds, give the V60 a gentle swirl to even out the bed.
5. First pour. @0:45 Pour slowly to 150g total, spiralling from the centre outward. Keep the flow steady — not aggressive. The goal is to keep the coffee bed submerged and agitated gently, not to splash water at the filter walls. Pouring onto the filter paper bypasses the coffee entirely and dilutes the cup.
6. Second pour. @1:15 Pour up to 200g total, same technique. By now the coffee bed should be giving off a clean, sweet steam — if you're using something fruity and well-roasted, this is when the aroma really opens up.
7. Third pour. @1:45 Pour to 250g total. Stay controlled. No need for drama at this stage.
8. Final swirl. @2:00 Once all the water is added, give the V60 one gentle swirl or stir to flatten the coffee bed. A flat bed at the end of drawdown means every ground had roughly equal contact with the water — which means more consistent extraction across the cup.
9. Drawdown. @2:30–3:00 The coffee should finish draining between 2:30 and 3:00 minutes. Watch it. If it finishes in under two minutes, the cup will taste underextracted — sour, thin, hollow. Over three minutes, it starts going bitter and heavy. Note the time and adjust the grind on your next brew.
Beginner Tip: The One-Pour Method
If managing three separate pours while watching a timer sounds stressful, simplify it. Bloom as normal (30g, 30–45 seconds), then pour the remaining 220g in a single slow, steady spiral. The cup will have slightly less separation and clarity than the multi-pour method, but it's still excellent coffee and a much kinder introduction to the V60. Start here if you need to.
Troubleshooting Your V60
One change at a time. This is the rule most people break and the reason they stay stuck. Change the grind, brew again, taste. If it's moving in the right direction, keep going. If not, you'll at least know that variable isn't the issue.
Advanced V60 Methods
The James Hoffmann Technique
Hoffmann's method is the one most specialty coffee baristas default to when someone asks what they actually brew at home. The bloom is standard — 2x the coffee weight in water (30g for 15g coffee), 45 seconds — but the pour structure changes. Rather than multiple pours, you switch to a single continuous pour once the bloom is done, keeping the water level steady all the way to 250g. Once the water is all in, swirl gently, then when the bed is nearly dry, give it one final stir to flatten it before the last of the water drains. The result is clean, sweet, and remarkably consistent once you've practised it a few times.
The 4:6 Method (Tetsu Kasuya)
Tetsu Kasuya won the 2016 World Brewers Cup with this. The idea is that the first 40% of your water controls flavour (sweetness vs. acidity), and the remaining 60% controls strength. Using 250g total water, you pour in five equal 50g pours with roughly 45-second intervals between each. More water in the first pour pushes sweetness; less pushes acidity. It's a precision tool rather than a daily driver, but brilliant for understanding how extraction variables actually interact.
What Coffee Works Best in a V60?
The V60 amplifies what's already in the coffe, which means it rewards beans with genuine origin character and punishes mediocre ones.
- •Light to medium-light roasts are the sweet spot. Ethiopian naturals brewed through a V60 can be startlingly fruity — blueberry, peach, hibiscus — in a way that feels more like tea than coffee until you're used to it.
- •Single origin washed coffees — Kenyan, Colombian, Guatemalan — tend to produce the most articulate, clearly defined cups. The V60's clarity is at its best when there's something worth being clear about.
- •Darker roasts can work, but they extract quickly and can tip into bitterness. Back off the temperature and grind slightly coarser if that's what you're working with.
The first time I ran a washed Kenyan through a V60, I genuinely stopped and stood at the kitchen counter for a moment. Blackcurrant, grapefruit, a long clean finish. It tasted nothing like what most people think of as coffee. That's the V60 at its best.
Conclusion
The V60 doesn't reward guessing. It rewards paying attention — to the grind, the pour, the drawdown time, and most importantly, what the cup actually tastes like. It took me an embarrassing number of bad brews to stop blaming the coffee and start looking at my own method.
Start with this baseline. Brew it the same way twice. Then adjust one thing. The coffee will tell you if you got it right.